Recently we made the HTTP/2 protocol available for all our customers to use for free. HTTP/2 is available across our whole IP network, and only for dedicated IP addresses.
We are sure you are already enjoying the benefits of this new feature, but let’s do a quick recap of what HTTP/2 can do and why it is so important.
How to enable HTTP/2?
Very easy!
Simply follow the steps below:
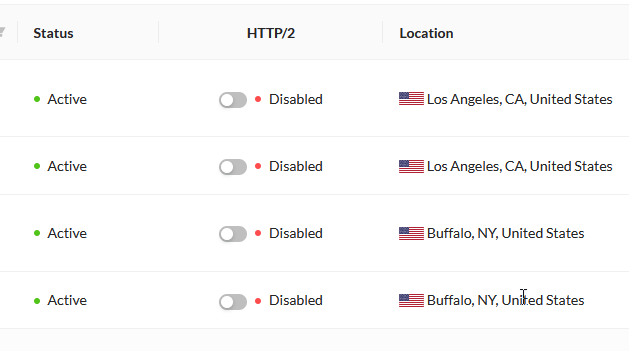
- Log in to the panel https://panel.priorityprospect.com/auth/login
- Go to your IP group
- Click on the switch in the "HTTP/2" column, and voila! Our system will update your IP address within 5 minutes.
What is it good to have HTTP/2?
This update will add incredible diversity to your network. The HTTP/2 protocol cannot be faked because it works entirely differently from the old HTTP/1.1 protocol and is only used with a SSL certificate. It offers extra diversity because it is not possible to run HTTP/2 and HTTP/1.1 from the default HTTPS port simultaneously.
In particular, HTTP/2 is faster and more efficient than HTTP/1.1. One of the ways in which HTTP/2 is faster is in how it prioritizes content during the loading process. It uses a multiplexed TCP/IP connection so it can perform multiple requests at the same time. Faster speeds mean better web performance and better experience for your website’s visitors and of course for Google bot.
What you must know and not do
HTTP/2 protocol can only be used with a SSL certificate. All HTTP requests are processed using HTTP/1.1. So make sure your domain has an SSL certificate installed.
Do not enable HTTP/2 for all your IP addresses because this will dissolve the diversity and will provide additional diversity. Also, it will look suspicious that suddenly all of your IP addresses switched to HTTP/2.
Make sure you have the right server signature for your IP address. Because if you have an old server signature attached to your IP address, Google can look at your request and assume that the web server is running on an old version that doesn’t support HTTP/2. So, you must be aware of what kind of server signature you use, and update the signature name accordingly. For example Apache started supporting HTTP/2 from version 2.4 and Nginx started supporting HTTP/2 from version ~1.9.5.
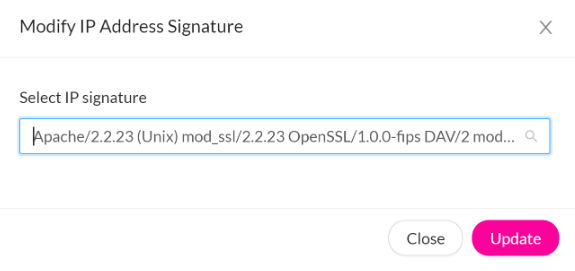
How to update a server's signature name?
- Log in to the panel and go to your IP group.
- Select an IP address and click the little pencil icon in the Server Signature column.
- Select the appropriate IP signature name from the list and click Update.


And that’s a wrap on HTTP/2!
Feel free to drop us a note if you have any questions or just looking to share your own experience or point of view on today’s blog post.